Bake Perfect Homemade Bread in 2 Hours: A Beginner's Guide
Imagine the aroma of freshly baked bread wafting through your home, a golden-brown crust promising a soft, fluffy interior. Many believe baking homemade bread is a long, complicated affair, reserved for seasoned chefs or grandmothers with endless time. But what if we told you that you could achieve this culinary dream in just about two hours? This comprehensive guide will demystify the process, empowering even the most novice baker to create incredible homemade bread that tastes far superior to anything from the store.
This isn't just another bread recipe; it's a testament to simplicity and speed, a method honed over countless loaves to deliver consistent, delicious results. Whether you're a complete beginner eager to try your hand at yeast baking or an experienced pro looking for a reliable, quick loaf, you'll find this 5-star homemade bread technique incredibly rewarding.
Why Bake Homemade Bread? The Irresistible Allure
There's a reason the phrase "the smell of fresh bread" evokes such comfort and nostalgia. It's more than just food; it's an experience. The unparalleled taste and texture of a warm slice of homemade bread, especially when slathered with a thick pat of butter, is truly one of life's simple pleasures. Beyond the sheer deliciousness, baking your own bread offers several compelling advantages:
- Unbeatable Flavor and Texture: Store-bought bread simply can't compare to the rich, nuanced flavor and tender crumb of a loaf baked with love in your own kitchen.
- Control Over Ingredients: You know exactly what goes into your bread – no mysterious additives, preservatives, or high-fructose corn syrup. This means healthier, purer bread for you and your family.
- A Rewarding Experience: From activating the yeast to pulling the golden loaves from the oven, the process of making bread is incredibly satisfying. There's a tangible sense of accomplishment that comes with creating something so fundamental and delicious from scratch.
- Impress Your Loved Ones: Few things delight guests or family members more than a warm loaf of homemade bread. It's a gesture of care and culinary prowess. In fact, many people cherish Grandma's Best Homemade Bread: Better Than Store-Bought! recipes for this very reason – it's a taste of home.
And the best part? You don't need a fancy stand mixer or years of experience. With just a handful of basic ingredients and a couple of hours, you can join the ranks of home bakers enjoying the fruits of their labor.
Gathering Your Simple Ingredients for Speedy Homemade Bread
One of the marvels of this easy homemade bread recipe is its minimal ingredient list. You likely have most of these staples in your pantry right now. The magic truly lies in combining them correctly and allowing the yeast to work its wonders.
What You'll Need:
- Warm Water: Crucial for activating the yeast. Aim for a temperature of about 105°F (40°C) – slightly warmer than lukewarm.
- Granulated Sugar: A small amount acts as food for the yeast, helping it to activate and contribute to the bread's golden crust.
- Instant OR Active Dry Yeast: The leavening agent that makes your bread rise. Ensure your yeast is fresh and active for best results.
- Salt: Essential for flavor, but also plays a role in controlling yeast activity and strengthening gluten structure.
- Vegetable or Canola Oil: Adds moisture, tenderness, and helps create a soft crust.
- All-Purpose Flour OR Bread Flour: All-purpose works beautifully for a tender crumb, while bread flour, with its higher protein content, can yield a chewier loaf. Feel free to experiment or even use part whole wheat flour for added texture and nutrition.
That's it! No complex additives, no rare ingredients. Just pure, wholesome goodness ready to be transformed into delectable loaves.
The Step-by-Step Guide to 2-Hour Homemade Bread Perfection
Let's dive into the practical steps that will guide you from simple ingredients to two magnificent loaves of fresh bread in record time. Follow these stages carefully, and you'll be amazed at your baking prowess.
Step 1: Activating Your Yeast (The Proofing Power)
This initial step is fundamental. Proper yeast activation ensures a good rise and a light, airy texture. In a large mixing bowl, combine your warm water (remember, around 105°F is ideal), 1 tablespoon of granulated sugar, and your yeast. Give it a gentle stir and let it sit undisturbed for about 5 minutes. You'll know your yeast is alive and well when it begins to puff up and create a foamy layer across the surface of the water. If it doesn't foam, your water might have been too hot (killing the yeast) or too cold (slowing it down too much), or your yeast might be old. Start again with fresh yeast and correct water temperature if this happens.
Step 2: Combining Remaining Ingredients and Mixing
Once your yeast is gloriously foamy, add the rest of the sugar, the oil, salt, and half of your flour to the bowl. Mix on low speed with an electric mixer (using the paddle attachment, or by hand with a sturdy spoon) until everything is just combined, about 1-2 minutes. Gradually add the remaining flour, a cup at a time, until the dough comes together and starts to pull away from the sides of the bowl. It should be shaggy but cohesive.
Step 3: The Art of Kneading for Superior Texture
Many beginners view kneading with trepidation, but it's a crucial and rewarding step. Kneading develops the gluten in the flour, which creates the elastic structure that traps the carbon dioxide produced by the yeast, allowing your bread to rise beautifully and achieve that coveted light, fluffy texture. If using an electric mixer with a dough hook, knead for 7 minutes on medium-low speed. If kneading by hand, prepare for a good arm workout and knead for 10-11 minutes on a lightly floured surface, pushing the dough away with the heels of your hands, then folding it back, turning, and repeating. Your dough should become smooth, elastic, and spring back when gently poked.
Step 4: The First Rise (Bulk Fermentation)
Lightly oil a clean bowl and transfer your beautifully kneaded dough to it, turning the dough once to coat all sides. Cover the bowl tightly with plastic wrap (lightly sprayed with oil on the side touching the dough) or a clean, damp kitchen towel. Plastic wrap often works better as it traps warm air, promoting a faster rise, crucial for our 2-hour goal. Place the bowl in a warm, draft-free spot. If your kitchen is cool, a trick is to turn your oven on for 2-3 minutes, then turn it off and place the covered bowl inside. Let the dough rise until it has doubled in size, typically 30-45 minutes in a warm environment for this quick recipe.
Step 5: Shaping and Second Rise (Proofing)
Gently punch down the risen dough to release the air. Divide the dough into two equal portions. On a lightly floured surface, shape each portion into a loaf. This usually involves flattening the dough into a rectangle, rolling it up tightly, and pinching the seam closed. Place each shaped loaf seam-side down into greased loaf pans. Cover the pans loosely with oiled plastic wrap or a towel and let them rise again in a warm spot for about 20-30 minutes, or until the loaves have nearly doubled in size and look puffy.
Step 6: Baking Your Golden Loaves
While your loaves are on their second rise, preheat your oven to 375°F (190°C). Once preheated and the loaves are fully risen, place the loaf pans in the oven. Bake for 25-30 minutes, or until the tops are beautifully golden brown and the internal temperature reaches 200-210°F (93-99°C) with an instant-read thermometer. If tapped on the bottom, the bread should sound hollow.
Step 7: The Final Touch: Butter Brush and Cooling
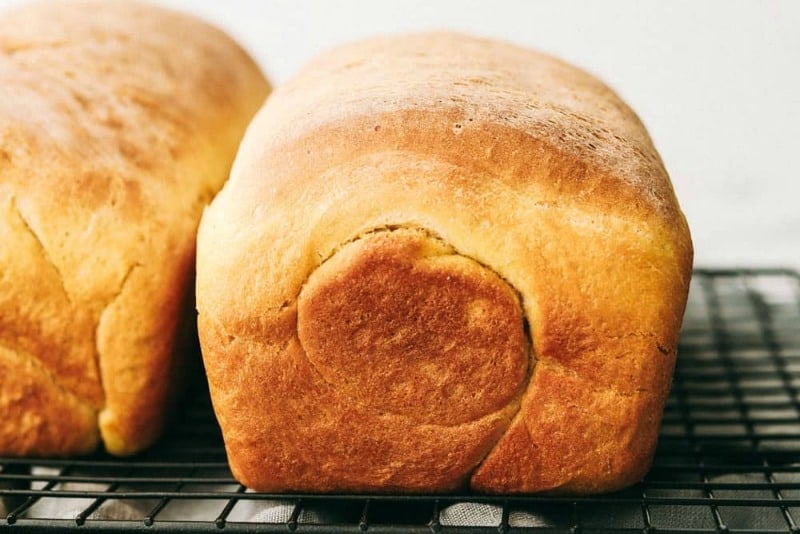
As soon as you remove the hot loaves from the oven, you can brush their tops with a little melted butter. This adds a lovely sheen, extra flavor, and helps create a wonderfully soft crust. Immediately transfer the loaves from their pans to a wire cooling rack. Cooling is just as important as baking; it allows the internal structure of the bread to set and prevents a soggy bottom. Resist the urge to slice into your bread right away – let it cool for at least 20-30 minutes. Then, slice, slather with butter, and enjoy the fruits of your labor!
Troubleshooting & Tips for Your Best Homemade Loaf
Even with the easiest recipes, challenges can arise. Here are some common issues and how to resolve them:
- Bread Didn't Rise: This is almost always a yeast issue. Ensure your water temperature is correct (105°F is critical) and your yeast is fresh. Old or dead yeast won't activate.
- Dense, Heavy Loaf: Likely culprits are not enough kneading (gluten didn't develop), too much flour (dough was too stiff), or insufficient rise time. Make sure your dough doubles in size during the first rise.
- Crust Too Hard: Overbaking or lack of humidity in the oven can cause this. A quick butter brush post-baking helps, as does ensuring you don't overbake.
- Sticky Dough: While dough should be slightly tacky, if it's excessively sticky and hard to handle, you might need a tiny bit more flour. Add it gradually, a tablespoon at a time, during kneading.
- Invest in a Thermometer: An inexpensive kitchen thermometer is invaluable for checking water temperature for yeast and the internal temperature of your baked bread.
- Measure Flour Accurately: Spoon flour into your measuring cup and level it off with a straight edge, rather than scooping directly from the bag, which can compact it and lead to too much flour.
Beyond the Basic Loaf: Customizing Your Homemade Bread
Once you've mastered this basic recipe, the world of homemade bread opens up to endless possibilities. This versatile dough is an excellent canvas for experimentation:
- Herb Infusion: Add dried rosemary, thyme, or oregano to the dough during the mixing stage for an aromatic loaf perfect with savory meals.
- Cheesy Goodness: Mix in shredded cheddar, Parmesan, or a blend of cheeses during the last minute of kneading.
- Garlic Lover's Dream: Incorporate roasted garlic cloves or garlic powder for a potent flavor boost.
- Sweet Variations: Turn it into a breakfast treat by adding cinnamon sugar swirls, raisins, or dried cranberries.
- Seed Toppings: Before the second rise, brush the tops of the loaves with a little milk or egg wash and sprinkle with sesame seeds, poppy seeds, or oats for extra texture and flavor.
Start with small additions, and as you gain confidence, you'll discover your own signature homemade bread creations.
Baking perfect homemade bread in just two hours isn't a myth; it's a delicious reality waiting for you. With this guide, a few simple ingredients, and a willingness to try, you'll soon be pulling warm, fragrant loaves from your oven, filling your home with an irresistible aroma and your table with an unforgettable treat. Embrace the journey, savor the process, and most importantly, enjoy every single slice of your incredible homemade creation!
